Lending Requests workflow
Lending request detail
To view lending request details, click on the title or request ID of the item within a lending queue.
Staff Notes
Search for requests
You can search for Active and Closed Requests from the home screen. To learn more, see Search for requests.
Edit Lending Requests
Respond to requests
View local holdings and availability for lending requests
If your library has enabled local holdings and availability, lending requests will display local holdings information for items held by your institution.
- If you are a WMS library, please see OPAC integration for more information about enabling this feature.
- If you are an Alma or Sierra library, please contact OCLC Support to discuss enabling this feature.
Real-time availability
Real-time availability enables the system to automatically respond No to lending requests that have an OPAC status of unavailable. This allows the requests to move through the lender string more quickly.
Lending requests for items that are not available will not appear in your request queue. Requests that the system has automatically said No to will use the reason for no of No - System checked availability.
Notes:
- Applies to Loan requests.
- If the OPAC status of the item is anything other than unavailable, or if the OPAC status cannot be returned, the automatic Reason for No will not be applied.
- No - System checked availability is not available for manual selection, but it will appear in the OCLC Usage Statistics, Report Designer, and Request History.
- Borrowers will see this Reason for No if the request is sent to a library using WorldShare ILL or Tipasa that is utilizing availability and the item status is unavailable.
Does my library have Real-time availability?
WMS libraries and libraries that subscribe to WorldCat Discovery Premium are configured for Real-time availability.
For all other institutions, complete this real-time availability questionnaire. For more information, contact oclcresourcesharing@oclc.org.
Single Holding
When a single holding is found, the Local ID and Local Holdings fields of the request are updated with the holdings information supplied by your OPAC. The Local Holdings fields include:
- Branch
- Shelving Location
- Call Number
- Holdings Source
- Holdings Source will be listed as OPAC.
- Availability Status
- Tipasa checks Availability once when the request is first sent to your library's symbol in the lender string. If you need to check the Availability status manually, you can click Search my library's online catalog.
The Local ID field is populated with the Branch, Shelving Location and Call Number information. This field appears on book straps and stickers for lending requests.
Multiple Holdings
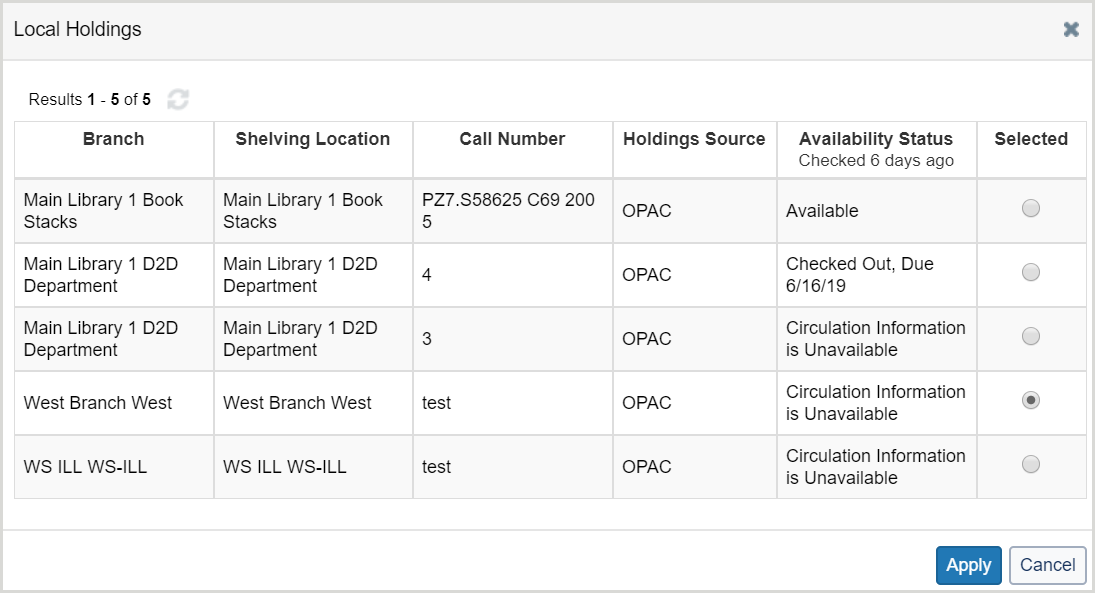
When multiple holdings are returned by your OPAC, the View All Local Holdings link will appear. The View All Local Holdings screen will show each instance of holdings for the requested item.
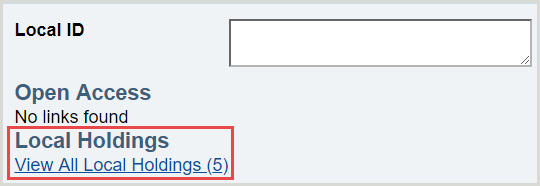
Select which holding to use and click the Apply button. The information for the selected holdings will appear in the Local ID and Local Holdings fields and will be saved with the request.
Request item from remote branch
When a requested item is held at a remote branch, you can send an email to the branch requesting the item be sent to the ILL department.
To request an item from a remote branch via email:
- On the left navigation, under Lending Requests, click Can You Supply?.
- On the Can You Supply? screen, click the request ID or Title to display the result.
- On the Request Details accordion, under Local Holdings, click View All Local Holdings. The View All Local Holdings screen will show each instance of holdings for the requested item.
- Select a remote holding and click Apply. The information for the selected holdings will appear in the Local ID and Local Holdings fields and will be saved with the request.
- At the top of the request, under Actions, click Email.
- On the Send Message window:
- If you have created a template for emails to your branch locations, select the template from the Choose a template drop-down list. All fields, with the exception of the To Email field, will populate with your template information. See Custom notifications for information about creating email templates.
- In the To Email field, select an email address from the drop-down list or enter an email address. See Address Book, Branches for information about configuring commonly used email addresses.
- Click Send.
Respond Yes to a Loan Request
Follow the instructions below to respond yes to a loan request.
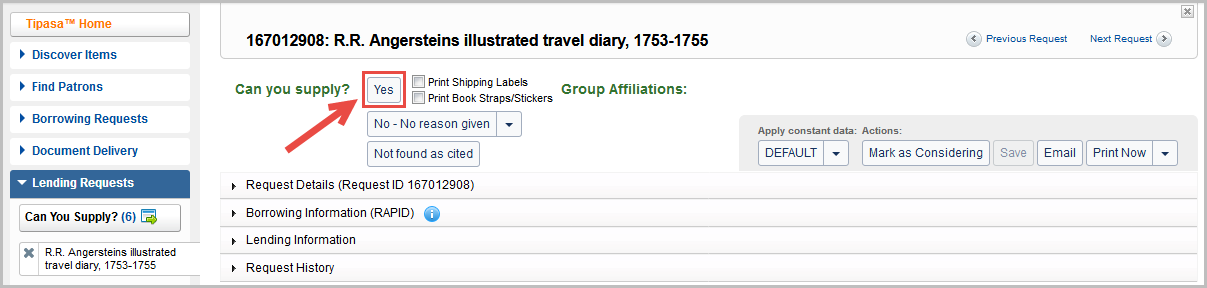
To respond yes to a loan request:
Note: To prevent additional responses to a request from other lending institutions, respond Yes to the request prior to shipping the item.
- On the left navigation, under Lending Requests, click Can You Supply?.
- Note: Request queues where batch processing is available include a batch icon (
 ) in the left navigation.
- Note: Request queues where batch processing is available include a batch icon (
- On the Can You Supply? screen, click the request ID or Title to display the request.
- In the request, review and confirm the information in the Request Details accordion.
- From the Apply constant data list at the top of the screen, select your constant data for loans.
- Note: When a different Constant Data is applied to a request, the fields are briefly highlighted in green as a visual indicator of the change. Data in a field of a constant data record will always overwrite the value shown in the request.
- Review the information in the Borrowing Information accordion.
- Note: Click the information icon (
 ) next to the Borrower's symbol to view their profile in the Policies Directory.
- Note: Click the information icon (
- Review the information in the Lending Information accordion.
- In the Request Details accordion, confirm the Due Date.
- (Optional) Enter a Local ID. The Local ID can be any local identifier number (for example, a call number or barcode number).
- At the top of the screen, click Save.
- (Optional) Select any printing options. For more information, see Printing.
- To respond yes to the request, click Yes.
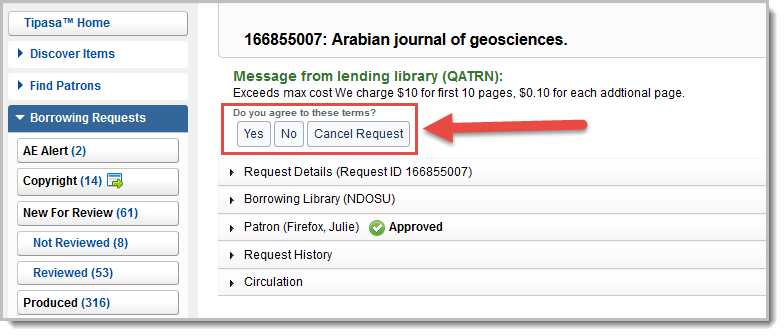
Note: If you have specified an ILL or IFM charge for the item you are lending, you will receive an alert if your charges exceed the maximum cost set by the borrower. If you click Update on the alert to proceed and update the status to Shipped, you are agreeing to the Borrower’s terms, which include their maximum cost and method of processing that payment. If you click Cancel, you have the option to respond no or conditionally to the request.
A confirmation message appears and the request appears under the category Lending Requests > Supplied > Shipped/In Transit.
For copy requests, see Respond Yes to a Copy Request.
Respond No to Requests as a Lender
If you have received a lending request and cannot supply the borrower with the item, follow the instructions below to respond no to the request.
To respond no to a request:
- On the left navigation, under Lending Requests, click Can You Supply?.
- On the Can You Supply? screen, click the request ID or Title to display the request.
- In the request, review and confirm the information in the Request Details accordion.
- Review and confirm the information in the Borrowing Information accordion.
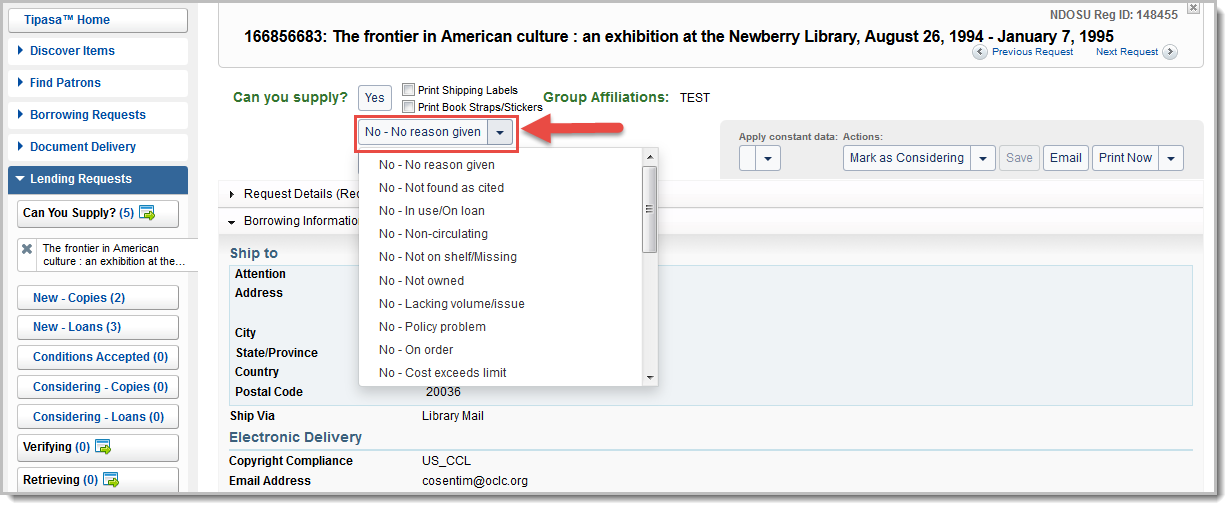
- To respond no to the request, click No.
- Optional. Click the down arrow to select a reason for saying no.
- A confirmation message appears, and the request goes to the next Lender in the lender string.
You can optionally choose to include a reason why you are responding No to the lending request. For more information, see Reasons for No.
Other options for responding to a request
- Respond Conditionally to a Request
-
If you have received a request, but need more information to decide whether you can fulfill it, you can respond conditionally.
To respond conditionally to a request:
- On the left navigation, under Lending Requests, click Can You Supply?.
- On the Can You Supply? screen, click the request ID or Title to display the request.
- In the request, review and confirm the information in the Request Details accordion.
- In the Borrowing Information accordion, confirm the delivery and payment information.
- To respond conditionally to the request, click Conditional.
- Optional. Click the down arrow to select a reason for the conditional.
- On the Send Conditional window, enter any additional information you want to send to the Borrower, if needed. This may include asking the borrower to change their max cost or allow the use of IFM.
- Click Send Response.
- A confirmation message appears and the request is returned to the Borrowing library. If the conditions are accepted, the request appears on the left navigation under Lending Requests > Can You Supply? Conditions Accepted.
- Respond a Renewal Request
-
Follow the instructions below to respond to a renewal request.
To respond to a renewal request:
- On the left navigation, under Lending Requests, click Supplied > Renewal Requested.
- On the Renewal Requested screen, click the request ID or Title to display the request.
- In the request, review and confirm the information in the Request Details accordion. Note the Borrower's desired Due Date and Renewal Requested date (if applicable).
- If you are willing to grant the renewal, edit the Due Date to reflect the new due date you wish to give.
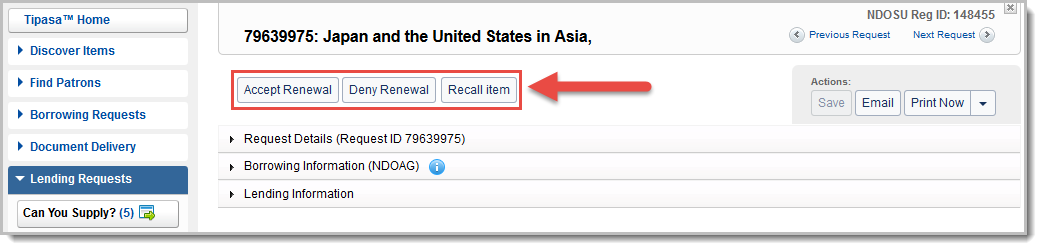
- Click an action:
- Accept Renewal to accept the request
- Deny Renewal to reject the request
- Recall item to request the return of an item
- A confirmation message appears and the request appears on the left navigation under Supplied > Received/In Use.
Use batch processing to respond Yes or No in a batch
- Navigate to Lending Requests > Can You Supply? in the left navigation bar.
- At the top of the next screen, click Yes or No next to Batch respond to "Can You Supply" items The screen refreshes to include the additional batch processing fields.
- Optional.
- If Yes, click any desired print options and Apply constant data if necessary. If a request ages out before you respond "Yes" and moves to another potential lender, any Constant Data you applied is removed from the request.
- If No, Choose a Reason for No from the drop-down list. This Reason for No applies to all requests that you process as No.
- In the Request ID field, manually enter a request ID number, scan a barcode, or click the plus symbol (
 ) to add a request.
 - Click Yes or No. A confirmation message appears and the requests are updated.
Complete requests
- On the left navigation, under Lending Requests, click Returned > Returned/In Transit.
- On the Returned/In Transit screen, click the request ID or Title to display the request. Note: Request queues where batch processing is available include a batch processing icon (
 ) in the left navigation.
 - In the request, review and confirm the information in the Request Details accordion.
- To complete the request, click Checked-in/Complete.
- A confirmation message appears and the request is complete. Note:
- If the item is marked Not Returned, it appears in the left navigation under Returned > Returned but Missing and ages out of the system after 180 days. See Request Aging for more information.
Deflections
Deflection is a feature that is such a time-saver because Lending libraries will often get requests for items that they do not lend over ILL- usually because their policies or license agreements dictate that certain items cannot be loaned through interlibrary loan. Deflection allows the system to say “no” to these requests on your behalf. It will skip your library in the lender string, and move the request on to the next lender.
Create Deflection Policies
Use the the OCLC Policies Directory to setup your Deflection policies.
Deflection is applied to the lender string to ensure that an unfilled request does not remain in WorldShare Interlibrary Loan or Tipasa as Pending, waiting for potential lenders to manually deny the request.
Deflection is not the same process as filtering. Filtering is a process that chooses lenders based on holdings data and other information from the holdings record before the request is created (produced). It takes place before the lender string is built. The Policies Directory is not involved with this processing.
To create a Deflection policy:
- Navigate to the Policies tab from the OCLC Policies Directory.
- Click the Add button on the Deflections drop-down.
- Enter the following required fields:
- Policy Name
- Request type. Options include:
- Copy
- Loan
- Copy or Loan
- Deflection type. Options include:
- Enable Real Time Deflection: Choose this option to enable the deflection policy.
- Enable Real Time Deflection - except when I am last in the lender string: Choose this option to enable the deflection policy except when the institution is the last lender in the lender string.
- Disable Deflection: Choose this option to disable the deflection. Select one of the above options to enable the deflection at a later time.
- Optional. Under Fees section, enter the Borrower maximum cost.
- Optional. Under Borrowers section, select the OCLC Group or Custom Holding Group to include in the deflection.
- Optional. Under Items, select the Item features for the deflection. Options include:
- Formats
- E-License Terms
- Material Age
- Optional. Enter Notes for the deflection.
- Click Save.
If the borrower returns to the request after it has been placed, the asterisk indicating the current lender will have moved to the next lender. The Request History will indicate the Reason for No:
- Auto-Deflection: Format Type
- Auto-Deflection: Profiled Group (covers profiled groups and Custom Holding Groups)
- Auto Deflection: Maximum Cost
- Auto Deflection: Age of Material
- Auto Deflection: Multiple Reasons
- Auto Deflection: Request Type
Deflection may be based on the request service type, local holdings, format type, OCLC profiled group membership, Custom Holding Group, maximum cost, E- license terms and material age in years. Exceptions can also be set, based on format type, OCLC profiled group membership, and Custom Holding Group. The default setting is for no deflection policies to be set.
If you have multiple deflections, requests are processed following the hierarchy for deflection listed below.
The hierarchy for deflection
The order in which deflections are processed is as follows:
- Supplier status
- LHR 008/20-21
- On-order status (WMS Acquisitions)
- Deflection policies configured in Policies Directory in the following order:
- Service type
- Format
- Profiled Group
- ELicense terms
- Custom Holdings Group
- Max Cost
- Age of Material
How it works
A simple scenario for deflection by format would be:
- The borrowing library creates a request choosing lenders that appear to be suppliers for the material.
- WorldShare Interlibrary Loan or Tipasa searches the first lender's policies in the Policies Directory to see if they will loan that format. For example, the format is "musical score" and the first lender has created a deflection policy to indicate that it does not loan musical scores.
- Instead of the lender getting the request as Pending, it skips that lender and automatically deflects to the next lender.
- The request moves through the string until it identifies a lender that might supply it.
Deflection exceptions
If you select Format, OCLC Group (profiled group), or Custom Holding Group as deflection criteria, you cannot select those criteria as exceptions.
| Example policy | Deflection option(s) selected | Exception criteria available |
|---|---|---|
| I do not loan e-serials. | Format | OCLC Group |
| I do not loan e-serials to profiled group XXXX. | Format OCLC Group | |
| I do not loan to profiled group XXXX. | OCLC Group | Format |
| I charge $15. | Borrower Maximum Cost | Format OCLC Group |
| I loan books only. | Format 2 | OCLC Group |
| I loan books only. | Format 3 OCLC Group |
|
| I only loan to all members of group XXXX. | Format OCLC Group 4 |
Issues to note:
- Filtering impacts the lender string that is created, i.e., a symbol can be excluded from the lender string based on the filter that is applied. Filtering is based on custom holdings paths/groups based on volume and year data in the local holdings record.
- There are two ways to create this policy. Here all formats are selected for deflection except for “book.” This is a listing of all formats not loaned.
- No deflection criteria are selected. Service type “loan” with no deflection criteria indicates that no formats are loaned. However, the exception format “book” indicates that only books are loaned.
- The institution only loans material to a selected profiled group. Choosing the exception eliminates the selection of the (long list of) individual profiled groups
Deflection Includes/Excludes
When creating deflection policies for your group, you can choose to block or not block certain groups or items. This feature allows your institution to be very specific about what groups and items a deflection policy pertains to, and those that it does not pertain to.
If you want to deflect a group or one or two items, use the Include feature. If you want to deflect everything except a group or one or two items, use the Exclude feature.
Examples
- To deflect everything except books, use Exclude and click Book (instead of using Include, where you would have to click all the other formats except Book). This is because when you are making an exception for that format and excluding it from your institution’s deflection policies.
- My library does not loan DVDs, but I want to allow other libraries in my group to borrow. For this policy, you would Exclude your group, and Include Visual Material –DVD.
Also, choosing two limiters combines both into one policy.
For example: Excluding the format Visual Material – DVD and then selecting a Material Age of Less than: 1 year will deflect only DVDs that are less than one year old.

On the Deflections screen, a green check mark ( ) indicates that the group or item is included in the deflection (in my library’s policies), meaning that the requests from those groups or for those items will be deflected. A red X (
 ) indicates that the group or item is not included in the deflection.
See also:
Email a copy of a request
Your library can send a formatted email of the request details to any email address using the Email button at the top right of any request screen.
Note: When a library sends an email, the email address in the From field will also receive a copy of the email.