Automate file retrieval and import
Discover how to configure, run, and delete an automated job in WorldShare Acquisitions.
Note: Branch-based acquisitions users can only manage importing for a branch where they have the appropriate permissions. See About branch-based acquisitions.
Configure an automated job
You can configure the automatic retrieval and import of vendor files using secure FTP protocol (SFTP).
Set up your vendor
- Contact your vendor to enable SFTP and grant edit permissions to your existing FTP account.
Note: Your vendor will likely provide a new URL, username, and password for your FTP account.
- Search for and open the vendor you would like to use. For detailed instructions, see Search for a vendor.
Note: The In Use radio button must be enabled.
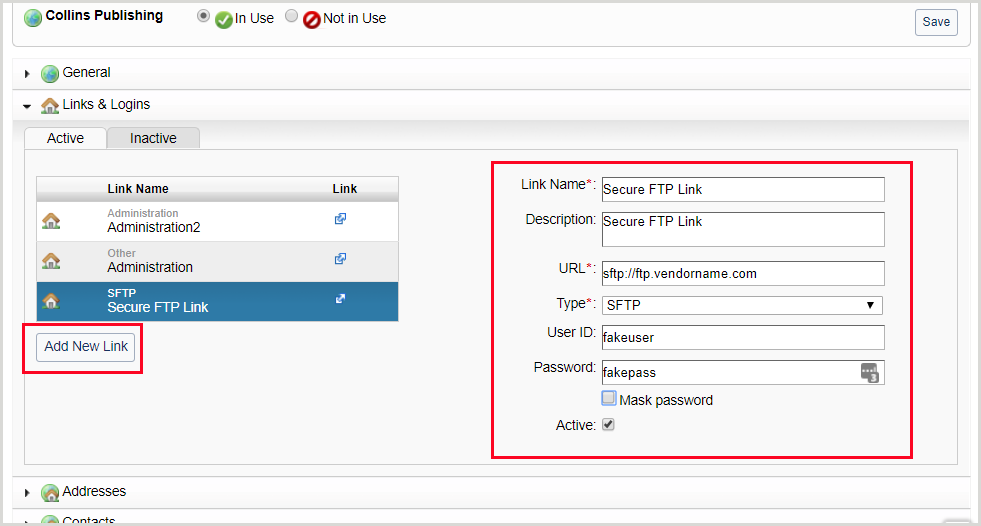
- Expand the Links and Logins section of the vendor profile.
- Click Add New Link.
- Enter the secure FTP account information you received from the vendor including:
- Link Name
- URL
- Type
- User ID
- Password
Note:
- The URL for the secure FTP account starts with sftp://.
- The Type FTP is not commonly used.

- Click Save.
Create automated job
- From the left navigation, expand Automated Jobs.
- Click Jobs.
- Click New Job to open the New Job dialog.
- Enter a name for the job, select a type (see below) from the Type drop-down list, and click Save.
- Invoice Import (EDIFACT)
- Order Import (MARC)
- Import order response data (EDIFACT)
- Invoice and Shelf-ready Import (MARC)
- Serial Issues Claim(s)
- Click Save to close the New Job dialog.
- From the Job Details screen, enter the following information:
- Vendor - Select from any vendor marked as In Use
- Secure FTP Link - Automatically populated with the previously configured value for this vendor
- Source Folder - Folder from which you want to retrieve files
Note: Up to 50 files can be retrieved from a vendor. If there are more than 50, they must be manually uploaded.
- File Type - Retrieve all files in this folder or only files with a specific file extension or prefix
Note: File type extensions and prefixes are case sensitive
- Post Processing - Leave the files in the folder or move them to a new folder
- In both cases, the file will be renamed.
- If you choose to move the files, you must specify a destination folder.
- Options (for select import types)
- Tax Handling (options for the tax calculation method)
Note: This option only applies currently to EDIFACT invoice import jobs.- Tax item cost - Calculates tax amount by multiplying tax percentage by the price
- Tax item, service charge, and shipping cost - Calculates tax amount by multiplying tax percentage by the price, service charges, and shipping
- Includes taxes in costs - Calculates tax amount by considering it as included in the price, service charges, and shipping
- Schedule (Weekly, Daily, Manual, or Inactive)
Note:
- If set to anything other than Inactive, the system will automatically run a test of the FTP connection.
- It is recommended to initially save the job as Inactive to make sure all changes are saved and to avoid errors.
- Notify - Enter the name of the user you want to be notified of the import
Note: This is an auto-suggest text field. Auto-suggestions for field-appropriate elements start with the first keystroke in the text field. Auto-suggestions include an email address for the user pulled from Delivery Notification of the WorldShare Admin module. If no email exists in the Delivery Notification section, the Library Record email address will be used.
- Click Save.
Test FTP link and schedule job
After saving a job as Inactive, you can test the FTP Link and view any errors by manually running the job.
- From the left navigation, expand Automated Jobs.
- Click Jobs.
- Search for and select the job you created above. See Search and filter automated jobs.
- Select Manual from the Schedule filter drop-down list.
- Click Save.
- The system tests the FTP Link and reports any errors.
Common errors
- Incorrect configuration on the library's side (e.g. wrong directory, wrong username or password, wrong URL)
- Incorrect configuration on the vendor side (e.g. write access has not been granted to the folder)
- Outage on vendor side
- Bug or technical issue in WMS
Run an automated job manually
- From the left navigation, expand Automated Jobs.
- Click Jobs.
- Search for and select the job to run. See Search and filter automated jobs.
- Select Manual from the Schedule filter drop-down list.
- Click Save.
- Click Run.
Delete an automated job
- From the left navigation, expand Automated Jobs.
- Click Jobs.
- Search for and select the job to delete. See Search and filter automated jobs.
- Click Delete.
